Sunday, March 02, 2008

How To Hide Google Adsense Ads In Home Page And Display Them Inside Post Pages Alone [Blogger Hacks]

One of my friends recently approached asking me to help him to hide Adsense ads on the home page of his blog and display them only in the individual article pages. It is a good idea to remove Ads from home page and display them in the article pages to give a professional look to the blog.

He motivated me to write this article and share the information of how to configure Blogger blog template to display ads only in the post pages alone. Let us see the steps to be followed for modifying the template to implement this

  1. Log in to Adsense
  2. Generate code required for displaying appropriate ads on you blog and paste it to a notepad
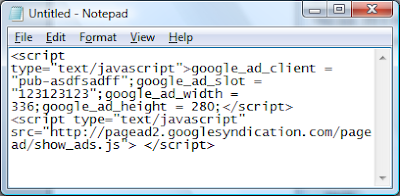
  3. After pasting the code to the notepad, remove the line breaks and comments from the Adsense code. Make sure that you code looks like the following (do not to modify any script of Adsense, just remove the line breaks and comments alone)
  1. Your Adsense code is ready now. Lets modify blogger template
  2. Log in to your blogger account select Layout of the blog which you want to modify
  3. Navigate through Template --> Edit HTML
  4. Take backup of your template by clicking Download Full Template. This backup will help you if you want to revert to old template
  5. Select Expand Widget Templates option to get access to the full code of the template
  6. Search for <data:post.body/>  in the template HTML and place the following before the <data:post.body/>

<b:if cond ='data:blog.pageType == "item"'>

<!-- Paste your adsense code prepared in step 3 here -->

</b:if>

  1. Replace the text <!-- Paste your adsense code prepared in step 3 here --> with the adsense code which you prepared in the step 3 using notepad.
  2. After completing the replace operation, code in your template should look similar to the following

<b:if cond='data:blog.pageType == "item"'>
  <script type="text/javascript">google_ad_client = "pub-asdfsadff";google_ad_slot = "123123123";google_ad_width = 336;google_ad_height = 280;</script>
<script type="text/javascript" src="http://pagead2.googlesyndication.com/pagead/show_ads.js"> </script>
</b:if>
<data:post.body/>

  1. Save the template by clicking on Save Template button
  2. That's all. Your Blogger template is configured to display ads only in the post pages

Troubleshooting Guide

Why Ads are not displayed?

This happens if you modify any attributes of Google Adsense ads by mistake while removing the comments and line breaks.  To solve the problem, get the Adsense code again from Google Adsense and remove the line breaks and comments carefully.

Why Ads are displayed in a table with borders around them?

This happens when the line breaks and comments are not replaced from the Adsense code pasted in Blogger Template. Remove all the line breaks and comment start tags and end tags to solve the problem.

If you face any other problems, please post a comment. We will help you to solve the problem.

Sunday, December 30, 2007

Headlines Ticker Widget - A New Year Gift For All Bloggers From Tech Dreams

Display a cool headlines ticker in your blogs and change the way it looks in the New year!

Yes, with our "Headlines widget" you can put a  customized latest posts ticker directly into your blogs unlike a normal code copy and past process.

Like our earlier headlines scroller widget, we developed a clean interface to take the full advantage of this cool feature:


Customize Post Ticker Widget

Blog address:
http://.blogspot.com

Number of posts:

Label Text:

Open posts:


Please leave your comments and suggestions regarding this component below.

Wednesday, December 26, 2007

How To Redirect Domain Via Google Apps/eNom Without www

Two days back we've just registered for a custom domain through blogger.com offered by Google Apps with the partnership of eNom.com.

But, to our surprise when we enter the domain address without the (www) in the address bar, it redirects to Google Apps Start page instead of our domain home page.It was really frustrating to see this type of issues.

After doing some search on the Internet, reading some blogs, and getting some feedbacks from the Google Apps Discussion Groups, finally, we got the right solution.Here's how the problem can be solved:

Access the eNom control Panel

        -Clear all the rows of Host Names that has the sign "@"

          with "(A) Address" under Record Type

        - Now, create a new row with the following information

               Host Name: @ 
               Address: www.domainname.com 
               Record type: URL Redirect

That's it!If you're still confused and need more information or detailed step by step guide, let us know. Your feedback can also help us to improve the instruction given here.

Tuesday, December 25, 2007

Introducing Related Articles

In an effort to provide you more useful information and pleasant reading experience on our blog, we've introduced Related Articles section. The Related Article section available at the end of every post displays articles related to the current post you are reading.

Hope you enjoy reading. Please let us know your feedback on the new feature through comments.

Wednesday, August 22, 2007

Easily Embed Your Favorite Google Map In Any Webpage

Embedding Google Map in your website with the help of WikiMapia is very easy.

Google Map view of Taj Mahal

Four simple steps to embed a Google Map in your page are

  1. Browse WikiMapia.org site and locate your favorite location in Google Maps
  2. Click on WikiMapia menu available on the right side top corner and select map on your page link
  3. Resize the frame you see on the screen to desired view and copy the html code
  4. Paste the html code on your webpage.

Try embedding your favorite Google Map location on your blog post/webpage and share your URL with us.

Thursday, July 05, 2007

Your Web Site Is My Technorati Favorite!!

Exchanging Technorati Favorites is one of the best ways to increase traffic to web sites. So I would like to be part of this experiment by exchanging  favorites. It is very simple, I will favorite your web site if you do the same. Here are the simple steps to be followed

  1. Add my web site as your favorite by clicking Add Tech Thoughts as Favorite
  2. After adding Tech Thoughts as your favorite, leave a comment on this page with information required to add your web site as my favorite.
  3. I'll favorite your site with in couple of hours

Technorati favorite exchange is a proven solution for increasing traffic. So it is worth getting spending time on getting as many number of favorites as possible.

You can also create one post like this and invite as many as friend you can to take part in this Technorati Experiment.

Monday, June 25, 2007

Preventing Ad Blindness on web sites to earn consistent money

If you are a Google AdSense publisher, you may notice steady decline in earnings as times goes on. This is because, regular visitors of your web site get used to your ads and they ignore them completely. This phenomenon is called as "Ad Blindness".

There is an easy way to solve this problem. Keep changing the color of ads regularly so that they look like fresh content. Google AdSense script allows publishers to specify multiple colors for links so that the colors can be rotated every time ads are displayed. For example if you want to rotate link color of your ads in Black, White and Blue you can replace "google_color_link" attribute in you AdSense code with the following code

google_color_link = ["FFFFFF","000000", "0000FF"];

Like this you can rotate colors for any color attribute in your Google AdSense code. Give it a try and enjoy this cool feature.

Sunday, June 24, 2007

Add Scrolling Headlines Widget to Your Blog for Professional Blog Design

Scrolling Headlines widget shows recent post titles of your blog like scrolling news headlines as seen in new web sites and TV news channels. Adding the widget to your blogger beta is very easy. In the following form

  1. Enter your blog name
  2. Enter the number of recent post titles which needs to be shown by the widget
  3. Click on Add Widget to my blog
Customize Headlines Scroller Widget

Your blog address:
http:// .blogspot.com

Number of posts:

Direction:

Open posts:

Headlines bullet:


Please leave a comment or send a message through Contact Me form (available in the right side top corner) if would like to suggest enhancements to this widget.

In the coming weeks I'm going to release few more widgets. Please do check the site often for updates or subscribe to our news letter. The list of Widgets which will be released soon are

  1. Scrolling Comments Widget
    • Shows comments of your posts as a scrolling headlines text 
  2. Scrolling Comments Widget (Comments of a single post)
    • Shows comments of the current post alone as a scrolling headlines text
  3. Recent Posts Widget
    • Show recent posts of the blog 
  4. Recent Posts Widget(specific label)
    • Show recent posts of the blog which are labeled with a specific word

You can also suggest us if you have any widget concept in your mind.We will try our level best to develop the widget for you.

Update: 15-July-2007

The widget is enhanced to support configuring Scroll Direction, Headlines bullet and opening post in a new window

Note: This widget adds a link with text "Grab this widget"  in your blog . If you want to get rid of this, please leave a message with your e mail id(use contact me form and provide your mail id).

Update: 27 May 2008

Due to overwhelming response from the blogger community, we are unable to serve new blogs. This widget is temporarily discounted from adding to new blogs.

Wednesday, June 20, 2007

Add Contact Me form to give professional look to your blog

Is your blog visitors sending messages to you with the help of comments? Are your missing direct advertising options on your blog due to lack of Contact Me form? If so don't worry, adding a Contact Me form to your blog is very easy. Without having any HTML programming skills we can easily add a contact me form using the free online services like Feedback.com, Response-o-matic and wufoo.com.

Once you signup with any one of these free sites, you can design the required form with the help of simple and elegant drag and drop user interface. After completing the design of the form,  you will be provided with a simple HTML which you have to copy and paste in your blog. To display a Contact Me form you can make us any of your older posts or use footer area. Otherwise to give more professional look, the Contact Me form can be displayed on a pop up window(to see demo, click on Contact Me link available on the right side top corner of my blog).

Displaying Contact Me form as a popup is bit tricky. Follow these simple steps to achieve it

  1. Place the HTML code of Contact Me form provide by free online service with in the <body> section of the following HTML snippet

    <html >
        <head>
            <title>Contact Me</title>
        </head>
        <body>
            <!-- Paste your Contact Me form code
                 provide by  free online
                 service below(before </body> tag) -->
        </body>
    </html>

  2. Save the code as a HTML file and upload it any web site (you can use Google page creator free service to host the file). After uploading the file, get the URL of the file.
  3. Now it is time to edit your blogger template HTML. Take a back up of your template HTML before modifying it so that we can rollback incase of any problems
  4. Copy and paste the following java script before the </head> tag of your blogger template HTML code
    <SCRIPT TYPE="text/javascript">
    <!--
    function popup(mylink, windowname)
    {
    if (! window.focus)return true;
    var href;
    if (typeof(mylink) == 'string')
    href=mylink;
    else
    href=mylink.href;
    window.open(href, windowname, 'width=400,height=200,scrollbars=yes');
    return false;
    }
    //-->
    </SCRIPT>

  5. It is almost over, we are just a single step away. Now add a Contact Me link in the desired location of your blog using the following HTML code
    <A 
    HREF="Don't forget to replace this text with your Contact Me form URL"
    onClick="return popup(this, 'notes')">Contact Me</A>

  6. That's all your blog displays a popup window contact form when some one clicks on Contact Me link.

Hope you have successfully added the Contact Me form. Incase if you face any difficulty please don't hesitate to contact me.

Saturday, June 16, 2007

Blogger Hack - Expandable post summaries for professional blog design

With little bit of modifications to your Blogger Beta template you can easily implement expandable post summaries in your blog main page. Expandable posts gives very professional and elegant look to your blog. You can hide most of the detailed content from main page and display them when the page of the post is opened.

If you observer my blog, voting widgets are displayed on my post links and not in my main page. Also, most of the images in my posts are shown only in the actual post links only. Moving bandwidth intensive content to posts' pages loads your main page very fast.

Let us see the steps to be followed for modifying the template to implement this

  1. Log in to your blogger account select Layout of the blog which you want to modify
  2. Navigate through Template --> Edit HTML
  3. Take backup of your template by clicking Download Full Template. This backup will help you if you want to revert to old template
  4. Search for ]]></b:skin> in your template HTML and paste the following piece of code in between ]]></b:skin> and </head>

<!-- Style to implement "Read more on this Article" link in all the posts (Start) -->
<style>
    <b:if cond='data:blog.pageType == "item"'>
        span.fullpost {display:inline;}
    <b:else/>
        span.fullpost {display:none;}
    </b:if>
</style>
<!-- Style to implement "Read more on this Article" link in all the posts (End) -->

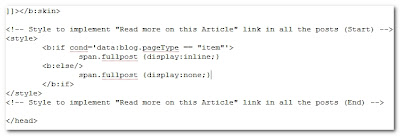
  1. After pasting the code, your template should look like as shown in the following image
  1. Save your template and click on select Expand Widget Templates
  2. Search for <data:post.body/> in the template HTML and paste the following piece of code after <data:post.body/>

<!-- Code to show "Read more on this article..." Link (Begin) -->
          <b:if cond='data:blog.pageType != "item"'>
              <span>
                <a expr:href='data:post.url' style='color:#0000FF; text-align:right; font-weight:bold; text-decoration:none' >Read more on this article...</a>
             </span>
          </b:if>
          <!-- Code to show "Read more on this article..." Link (End) -->

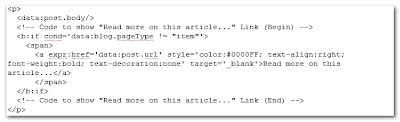
  1. After pasting the code, your template should look like as shown in the following image
  1. That's all. Your template is modified to show expandable posts.
  2. Now in every post, the content which you want to show only in post's page should be included between <span class="fullpost">This will be shown only in post's page</span>.
  3. Post a test article using the following HTML to see your blog working as expected

Hi, this is my test post.<span class="fullpost">This line is not shown in the main page</span>

Update on [2-July-2007]

Removed target='_blank' from step 7 code to avoid posts being opened in a new window.

Blogger Hacks - Simple way to hide Navigation Bar

Hiding navigation bar of your blog is very easy. You need to copy and paste the following hack code snippet in the template

/* CSS to hid navigation bar */

#navbar

{

        height:0px;

        visibility:hidden;

        display:none

}

Follow these easy steps to paste the above code

  1. Log in to your blogger account and select the Layout of the blog which you want to modify
  2. Select the tab page Template and then click on Edit HTML
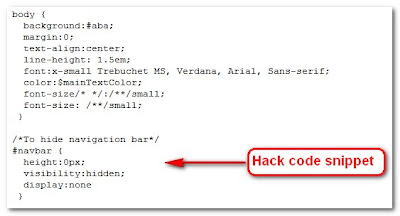
  3. Search for the text body { in your template HTML code and paste the hack code snippet after the end of body { ... } element.
  4. That's all. From now onwards your blog will not display navigation bar.

This is how your template HTML code should look after pasting the hack code snippet

Thursday, June 14, 2007

Adding BestOfIndya voting widget on Blogger posts

Adding voting widget of BestOfIndya on your Blogger posts is very easy. Follow these steps to add the widget

  1. Login to your blogger account
  2. Select your blog -> Template -->Edit HTML
  3. Check Expand Widget Templates check box
  4. Search for <div class='post-body'> tag in your template HTML
  5. Copy and paste the code following code after <div class='post-body'> <p>

<script type="text/javascript">Style="Sleek";submit_url = "<data:post.url/>"</script>
<script type="text/javascript" src=" http://www.bestofindya.com/news/cevb/button.php%22></script>