Sunday, July 27, 2008

Guide To Setup A Mobile Friendly Version Web Site Of Your WordPress/Blogger/TypePad/Other Blog

MoFuse LogoRecently we announced the launch of mobile friendly version of our blog. The mobile edition of the blog is accessible at the URL m.techdreams.org and you can preview the iPhone friendly version here.

Creating mobile friendly version of a blog is very simple with the help of MoFuse.com service. When we say simple, we really mean it. It is as simple as setting up a WordPress blog.

Based on our experience in creation of m.techdreams.org, we are writing this post to help others to set their own mobile version of their blogs.

Read the rest of this entry »

Sunday, June 08, 2008

3 Must to Have Free Applications For Bloggers

I’ve been blogging for couple of years. I tried many applications over time to blog efficiently. Most of the application I tried are very useful and few were annoying.

Here are the 3 free blogging application that I find very useful for blogging. I recommend these applications as must to have for all the bloggers.

Windows Live Writer

This is an amazing desktop application from Microsoft that helps you to post articles to any popular blog platform ( Wordpress, Blogger, TypePad, Movable & etc). The interface of Live Writer is very simple and extremely easy to use. Inserting Photos, Videos, Maps, Code Snippets are simple as Ctrl+C & Ctrl + V.

The recent Technology Preview of Live Writer even supports image editing. There are tons of features in Live Writer and it requires a full length blog post to explain all the features. Just to give a glance of features I’ll name few of my favourites: spell checking, offline blogging, switching from blog to another blog, inserting tables, pinging blog search engines, paste special(similar to word), preview before posting.

Also there are many useful free plug-ins developed by community members to enhance blogging experience.

For techies: Live Writer is the first application from Microsoft that is completely developed in .NET.

FileZilla

Do you share content with your readers that can be downloaded by them? Do you add or modify themes, plug-ins often to your blog? Here is an excellent tool for you. FileZilla, is the best of free client applications that manages FTP operations.

FileZilla is developed by Mozilla corporation which also develops the famous Firefox browser.

IrfanView

IrfanView is a nice application for capturing screen shots and editing them for blogging purpose. IrfanView is a lightweight application and also powered by community plug-ins.

Did we miss any of the tools that you feel like must to have for bloggers? You are welcome to let us hear your favourite tools through comments.


Thursday, May 29, 2008

Blog - Explained In Plain English For Non-Geeks

Are you a non-geek who don't understand what is a blog? Then here is a video to help you to understand what are blogs in plain English.

This video gives answers to the following questions

  1. What are blogs?
  2. How blogs are different from News web sites?
  3. How blogs changed the online media?
  4. How to find blogs?
  5. Where to start a blog for free?

Thursday, May 15, 2008

Learn To Use Windows Live Writer [Video]

Windows Live Writer is a powerful desktop application from Microsoft that allows bloggers to post content to blogs as simple as creating a Word documents. Live Writer supports posting content to almost all the popular blogs like Wordpress, Blogger, Typepad, live spaces, etc.

Microsoft has released a video that demonstrates the various features of Windows Live Writer and also how to use those features.

For bloggers who don't know to use Windows Live Writer this is a must watch video.

>>Download Live Writer   >>Live Writer Home   >>Live Writer Plugins

Wednesday, December 26, 2007

How To Redirect Domain Via Google Apps/eNom Without www

Two days back we've just registered for a custom domain through blogger.com offered by Google Apps with the partnership of eNom.com.

But, to our surprise when we enter the domain address without the (www) in the address bar, it redirects to Google Apps Start page instead of our domain home page.It was really frustrating to see this type of issues.

After doing some search on the Internet, reading some blogs, and getting some feedbacks from the Google Apps Discussion Groups, finally, we got the right solution.Here's how the problem can be solved:

Access the eNom control Panel

        -Clear all the rows of Host Names that has the sign "@"

          with "(A) Address" under Record Type

        - Now, create a new row with the following information

               Host Name: @ 
               Address: www.domainname.com 
               Record type: URL Redirect

That's it!If you're still confused and need more information or detailed step by step guide, let us know. Your feedback can also help us to improve the instruction given here.

Friday, December 21, 2007

Trojan Horse Virus Spreading Through Google AdSense

ZDNet News posted an article on a imageTrojan horse virus being spread through the Google AdSense advertising program. According to ZDNet News and Bitdefendter Antivirus firm


Advertisements placed by Google in Web pages are being hijacked by so-called Trojan horse software that replaces the intended text with ads from a different provider.

The Trojan redirects queries meant to be sent to Google servers to a rogue server, which displays ads from a third party instead of ads from Google.

Google quickly reacted to embarrassing problem in their famous advertising program and said

We have cancelled customer accounts that display ads redirecting users to malicious sites or that advertise a product violating our software principles.

The virus is identified as Trojan.Qhost.WU and the rate at which it spreads is low. It affects users by redirecting them to malicious sites and affects web publishers/webmasters by stealing their ad revenues.

Friday, December 14, 2007

Download Free Camtasia Studio From TechSmith - Fully Working Version

Camtasia Studio, the popular screencasting application from TechSmith is now available as Free download. TechSmith is giving away fully licensed and working version of Camtasia Studio version 3 to all users.

You can download the software from TechSmith Download Centre and register at TechSmith to request for activation key.

image

TechSmith sends an email with activation key as soon as you register. Install Camtasia Studio with the downloaded installable and enter the registration key to activate it.

Are you wondering why this software is being made available FREE of cost to all users? The answer is: this is a new advertising model implemented by TechSmith to attract more users.

Related : Download Free SnagIT v7.2.5 Software From TechSmith - Full Working Version

The version of Camtasia Studio FREE download is 3.0 but the latest version is 5.0. By downloading version 3.0 and using it for sometime, users will automatically tend to upgrade to 5.0 because of the great features available in the newer version.

Though you may miss few new features of new software, Camtasia Studio 3 will solve most of your screencasting problems. This software is good enough for bloggers to author decent screencast.

If you would like to enjoy all the new features, the free copy can be upgraded to Camtasia Studio 5 edition at half the standard cost. Isn't a good idea to download version 3 and upgrade it 5 at half the price instead of directly buying Camtasia Studio 5?

Thursday, December 06, 2007

Blog It If It’s Big Or Small..Blog Even If You’re Wrong..[Video]

The Here Comes Another Bubble is a funny link-bait video..A must watch for every blogger

Related

Not able to watch the YouTube video?

If your school/office/university banned access to YouTube and you are not able to watch this is video, then learn how to Access Blocked YouTube at Office / School / University.

Tuesday, November 13, 2007

AdSense Millionaire Markus Frind - $10000 a day from AdSense.

Have you ever met someone who is simply amazing?Well I have and that someone is Markus Frind, the owner of the free dating site PlentyOfFish.com has been pulling in $10,000 a day from Adsense. What is even more remarkable is that he is single handedly running one of the largest dating sites on the internet.

Markus rocked the Internet world when he posted a photo of his latest Google AdSense check for nearly $1 million CAD.

Online dating is a very big business with large companies and multi-million dollar budgets but Markus and his one man operation took them on and today he is a force to be reckoned with.

Markus advocates a very simple, fast-loading design.

Quote:

"Function over form to build an emotional connection with the user. Blend ads into content, No flashing crap, make the site useful. Basically all those things that everyone knows you are supposed to do, but very few people actually do."

Sunday, October 28, 2007

Advertising on Facebook Sucks!!

Amit Agarwal of Digital Inspirations recently ran two ad campains on Facebook and had a bad experience. Amit purchased  5,000 ad impressions for 10$ on Flyers Basic of Facebook advertising system. And for his surprise he was able to get only 5 visits to his site from that ad campaign.

Observing his bad experience on Facebook advertising I feel it is better to stick to Google AdWords. For Indian content blogs I prefer to run ad campaigns on indianpad, the Indian version of famous DIgg.

Seems to be Google sensed that there is not much threat from Facebook and their bidding for Facebook share was less compared to Microsoft(Microsoft is the highest bidder for Facebook share and the deal is through) .

Read full story of Amit in his blog post.

Friday, October 26, 2007

Track Your Comments On Blogger Blogs

Yesterday Blogger released a small and much needed feature of tracking comments. Now we can subscribe to email notifications when a new comment is made on the post which we commented earlier.

To create a follow up to track comments just select "Email follow-up comments to xxxxx@gmail.com".

It is also possible to track blogger comments through rss/atom feeds but not many people like to read the comments as feed items.

Unlike WordPress plugin "Subscribe to Comments" where anyone can subscribe to email notifications, blogger allows only Google/Blogger account readers to subscribe.

So only readers who have Blogger/Google account can be benefited by this new feature.

Hope soon Google will allow everyone to subscribe to comments.

Tuesday, September 18, 2007

Watch Never Ending Stream of Amazing Pictures Uploaded by Bloggers

Google Blogger launched Blogger Play, a never ending slideshow of amazing pictures recently uploaded to Blogger blogs. Blogger Play fetches images available in posts of public blogs listed on the web and showcases them in a beautiful way.

Once you start the slide slow you will never feel like stopping it. You will enjoy great snapshots of what people are thinking and posting about right now on Blogger hosted blogs.Along with the picture you can even read a short excerpt of the accompanying blog post and the profile of the blogger.

The pictures displayed in the slideshow are appropriate to all age groups as Blogger Play uses Google SafeSearch algorithm to filter out inappropriate images. If you ask me this is an excellent entertainer and many people are going to be addictive.

Blogger Play can download as much as 200 MB to run an hour long slideshow. If you are using limited broadband connectivity plans you should have an eye on broadband usage meter.

More information for Blogspot Bloggers

By default Blogger Play shows images of all the public listed Blogspot blogs. If you wan to opt-out you can remove your blog from the Blogger’s public blog listing.

Tuesday, August 21, 2007

Embed AdSense Ads Between Blogger Posts

Very happy to hear the announcement from Google AdSense team about in-built support for Blogger templates to embed Ads between posts. Blogger widgets now supports showing ads between the post with out any template coding or hacks. This is supported through new AdSense configuration in Blog Posts widget. Follow these steps to configure your Blogger Template to show ads between posts

  1. Login in to your Blogger account
  2. Click Template link of your blog and select Page Elements link
  3. Click Edit link available in the Blog Posts widget
  4. Select Show Ads Between Posts option
  5. Configure how often you want to ads to displayed( ex: An ad after every post or an ad after every two posts, etc)
  6. Customize the ad look and feel by selecting required format and colors
  7. Click on Save Changes link when you're done
As the embed ads between the post blend well with the content and increases click through rate, this support is welcomed by Bloggers.

Thursday, July 05, 2007

Your Web Site Is My Technorati Favorite!!

Exchanging Technorati Favorites is one of the best ways to increase traffic to web sites. So I would like to be part of this experiment by exchanging  favorites. It is very simple, I will favorite your web site if you do the same. Here are the simple steps to be followed

  1. Add my web site as your favorite by clicking Add Tech Thoughts as Favorite
  2. After adding Tech Thoughts as your favorite, leave a comment on this page with information required to add your web site as my favorite.
  3. I'll favorite your site with in couple of hours

Technorati favorite exchange is a proven solution for increasing traffic. So it is worth getting spending time on getting as many number of favorites as possible.

You can also create one post like this and invite as many as friend you can to take part in this Technorati Experiment.

Monday, June 25, 2007

Preventing Ad Blindness on web sites to earn consistent money

If you are a Google AdSense publisher, you may notice steady decline in earnings as times goes on. This is because, regular visitors of your web site get used to your ads and they ignore them completely. This phenomenon is called as "Ad Blindness".

There is an easy way to solve this problem. Keep changing the color of ads regularly so that they look like fresh content. Google AdSense script allows publishers to specify multiple colors for links so that the colors can be rotated every time ads are displayed. For example if you want to rotate link color of your ads in Black, White and Blue you can replace "google_color_link" attribute in you AdSense code with the following code

google_color_link = ["FFFFFF","000000", "0000FF"];

Like this you can rotate colors for any color attribute in your Google AdSense code. Give it a try and enjoy this cool feature.

Sunday, June 24, 2007

Add Scrolling Headlines Widget to Your Blog for Professional Blog Design

Scrolling Headlines widget shows recent post titles of your blog like scrolling news headlines as seen in new web sites and TV news channels. Adding the widget to your blogger beta is very easy. In the following form

  1. Enter your blog name
  2. Enter the number of recent post titles which needs to be shown by the widget
  3. Click on Add Widget to my blog
Customize Headlines Scroller Widget

Your blog address:
http:// .blogspot.com

Number of posts:

Direction:

Open posts:

Headlines bullet:


Please leave a comment or send a message through Contact Me form (available in the right side top corner) if would like to suggest enhancements to this widget.

In the coming weeks I'm going to release few more widgets. Please do check the site often for updates or subscribe to our news letter. The list of Widgets which will be released soon are

  1. Scrolling Comments Widget
    • Shows comments of your posts as a scrolling headlines text 
  2. Scrolling Comments Widget (Comments of a single post)
    • Shows comments of the current post alone as a scrolling headlines text
  3. Recent Posts Widget
    • Show recent posts of the blog 
  4. Recent Posts Widget(specific label)
    • Show recent posts of the blog which are labeled with a specific word

You can also suggest us if you have any widget concept in your mind.We will try our level best to develop the widget for you.

Update: 15-July-2007

The widget is enhanced to support configuring Scroll Direction, Headlines bullet and opening post in a new window

Note: This widget adds a link with text "Grab this widget"  in your blog . If you want to get rid of this, please leave a message with your e mail id(use contact me form and provide your mail id).

Update: 27 May 2008

Due to overwhelming response from the blogger community, we are unable to serve new blogs. This widget is temporarily discounted from adding to new blogs.

Thursday, June 21, 2007

Embed online polls in your site to understand your visitors

Understanding visitors and knowing their opinions is one of the most important factor to improve web site traffic. When you know about your visitors, you can provide content which they like. In order to understand your visitors Vizu Web Polls provides free service to create web polls. Here is a sample web poll created with the help of Vizu Web Polls.


Vizu New Member Registration Form

Wednesday, June 20, 2007

Add Contact Me form to give professional look to your blog

Is your blog visitors sending messages to you with the help of comments? Are your missing direct advertising options on your blog due to lack of Contact Me form? If so don't worry, adding a Contact Me form to your blog is very easy. Without having any HTML programming skills we can easily add a contact me form using the free online services like Feedback.com, Response-o-matic and wufoo.com.

Once you signup with any one of these free sites, you can design the required form with the help of simple and elegant drag and drop user interface. After completing the design of the form,  you will be provided with a simple HTML which you have to copy and paste in your blog. To display a Contact Me form you can make us any of your older posts or use footer area. Otherwise to give more professional look, the Contact Me form can be displayed on a pop up window(to see demo, click on Contact Me link available on the right side top corner of my blog).

Displaying Contact Me form as a popup is bit tricky. Follow these simple steps to achieve it

  1. Place the HTML code of Contact Me form provide by free online service with in the <body> section of the following HTML snippet

    <html >
        <head>
            <title>Contact Me</title>
        </head>
        <body>
            <!-- Paste your Contact Me form code
                 provide by  free online
                 service below(before </body> tag) -->
        </body>
    </html>

  2. Save the code as a HTML file and upload it any web site (you can use Google page creator free service to host the file). After uploading the file, get the URL of the file.
  3. Now it is time to edit your blogger template HTML. Take a back up of your template HTML before modifying it so that we can rollback incase of any problems
  4. Copy and paste the following java script before the </head> tag of your blogger template HTML code
    <SCRIPT TYPE="text/javascript">
    <!--
    function popup(mylink, windowname)
    {
    if (! window.focus)return true;
    var href;
    if (typeof(mylink) == 'string')
    href=mylink;
    else
    href=mylink.href;
    window.open(href, windowname, 'width=400,height=200,scrollbars=yes');
    return false;
    }
    //-->
    </SCRIPT>

  5. It is almost over, we are just a single step away. Now add a Contact Me link in the desired location of your blog using the following HTML code
    <A 
    HREF="Don't forget to replace this text with your Contact Me form URL"
    onClick="return popup(this, 'notes')">Contact Me</A>

  6. That's all your blog displays a popup window contact form when some one clicks on Contact Me link.

Hope you have successfully added the Contact Me form. Incase if you face any difficulty please don't hesitate to contact me.

Saturday, June 16, 2007

Blogger Hack - Expandable post summaries for professional blog design

With little bit of modifications to your Blogger Beta template you can easily implement expandable post summaries in your blog main page. Expandable posts gives very professional and elegant look to your blog. You can hide most of the detailed content from main page and display them when the page of the post is opened.

If you observer my blog, voting widgets are displayed on my post links and not in my main page. Also, most of the images in my posts are shown only in the actual post links only. Moving bandwidth intensive content to posts' pages loads your main page very fast.

Let us see the steps to be followed for modifying the template to implement this

  1. Log in to your blogger account select Layout of the blog which you want to modify
  2. Navigate through Template --> Edit HTML
  3. Take backup of your template by clicking Download Full Template. This backup will help you if you want to revert to old template
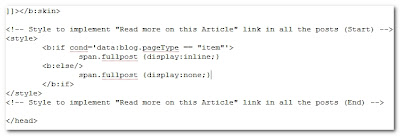
  4. Search for ]]></b:skin> in your template HTML and paste the following piece of code in between ]]></b:skin> and </head>

<!-- Style to implement "Read more on this Article" link in all the posts (Start) -->
<style>
    <b:if cond='data:blog.pageType == "item"'>
        span.fullpost {display:inline;}
    <b:else/>
        span.fullpost {display:none;}
    </b:if>
</style>
<!-- Style to implement "Read more on this Article" link in all the posts (End) -->

  1. After pasting the code, your template should look like as shown in the following image
  1. Save your template and click on select Expand Widget Templates
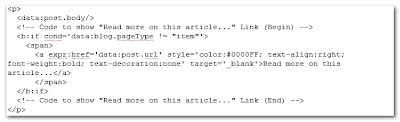
  2. Search for <data:post.body/> in the template HTML and paste the following piece of code after <data:post.body/>

<!-- Code to show "Read more on this article..." Link (Begin) -->
          <b:if cond='data:blog.pageType != "item"'>
              <span>
                <a expr:href='data:post.url' style='color:#0000FF; text-align:right; font-weight:bold; text-decoration:none' >Read more on this article...</a>
             </span>
          </b:if>
          <!-- Code to show "Read more on this article..." Link (End) -->

  1. After pasting the code, your template should look like as shown in the following image
  1. That's all. Your template is modified to show expandable posts.
  2. Now in every post, the content which you want to show only in post's page should be included between <span class="fullpost">This will be shown only in post's page</span>.
  3. Post a test article using the following HTML to see your blog working as expected

Hi, this is my test post.<span class="fullpost">This line is not shown in the main page</span>

Update on [2-July-2007]

Removed target='_blank' from step 7 code to avoid posts being opened in a new window.

Blogger Hacks - Simple way to hide Navigation Bar

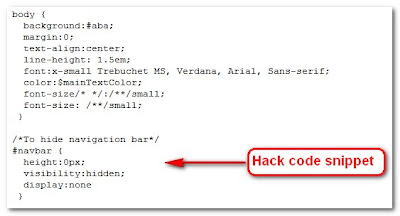
Hiding navigation bar of your blog is very easy. You need to copy and paste the following hack code snippet in the template

/* CSS to hid navigation bar */

#navbar

{

        height:0px;

        visibility:hidden;

        display:none

}

Follow these easy steps to paste the above code

  1. Log in to your blogger account and select the Layout of the blog which you want to modify
  2. Select the tab page Template and then click on Edit HTML
  3. Search for the text body { in your template HTML code and paste the hack code snippet after the end of body { ... } element.
  4. That's all. From now onwards your blog will not display navigation bar.

This is how your template HTML code should look after pasting the hack code snippet